vue中整合bootstrap、layer弹框、axios跨域请求 (原创)
发布时间:2020-04-15 21:51:03 文章分类:vue学习 阅读(912) 评论(0)
vue项目中整合bootstrap、layer弹框、axios跨域请求
1、初始化vue项目
vue init webpack vue_layer
2、安装jquery依赖
cnpm install jquery@3.2.1 --save
3、安装axios和qs依赖
cnpm install axios --save
cnpm install qs --save
4、安装vue-layer依赖
cnpm install vue-layer --save
5、build/webpack.base.conf.js配置
const webpack=require('webpack');
module.exports={
plugins: [
new webpack.optimize.CommonsChunkPlugin('common.js'),
new webpack.ProvidePlugin({
jQuery: "jquery",
$: "jquery"
})
],
//...
}
6、main.js修改
//引入jquery和bootstrap
import $ from 'jquery';
import '../static/bootstrap-3.3.7/dist/css/bootstrap.css';
import '../static/bootstrap-3.3.7/dist/js/bootstrap.js';
//引入layer 弹框组件
import layer from 'vue-layer';
import 'vue-layer/lib/vue-layer.css';
Vue.prototype.$layer = layer(Vue);
//引入axios
// import axios from 'axios';
// Vue.prototype.$axios = axios;
7、App.vue中可适当调整layer组件的默认vl-notify的样式,如
<style>
/*
全局样式 (没有加scoped),对整个项目的vue文件都生效
*/
.vl-notify.vl-notify-alert .vl-notify-content .vl-notify-content-div {
margin-top: 12px;
font-size: 14px;
margin-left: 10px;
-webkit-box-flex: 1;
-ms-flex: 1;
flex: 1;
}
</style>
8、config/index.js修改,配置代理
module.exports = {
dev: {
proxyTable: {//配置代理
'/api': {
target:"http://127.0.0.1:8083/",
chunkOrigins: true,
pathRewrite:{
'^/api': '/'
}
}
},
//...
}
//...
}
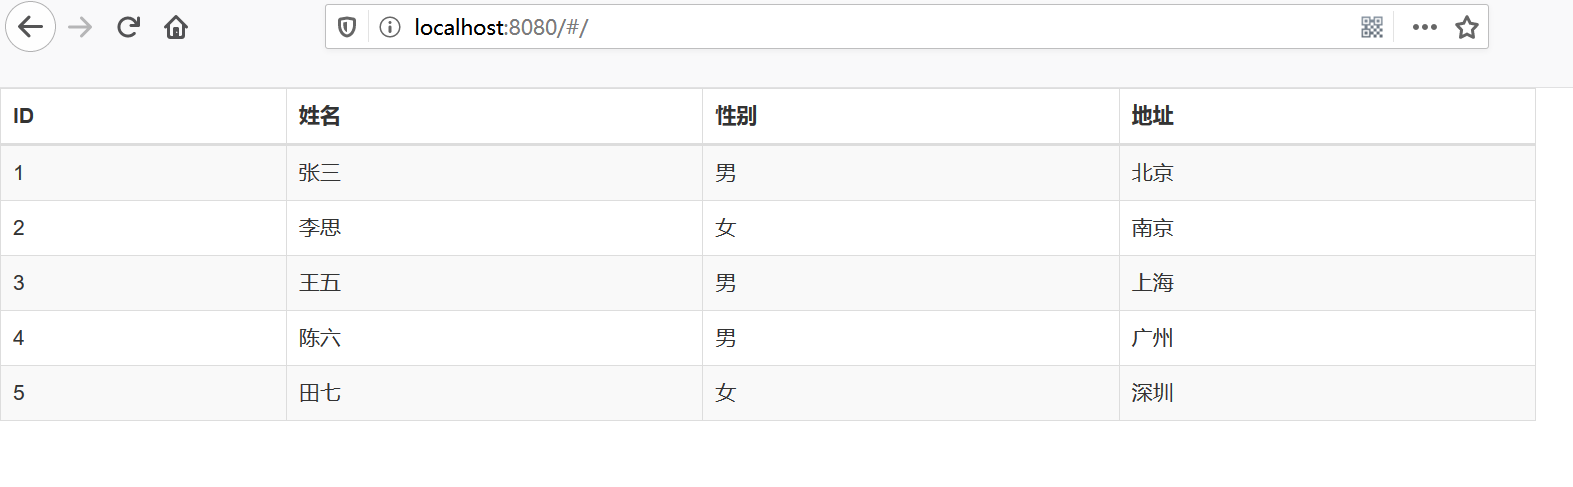
9、App.vue示例
<template>
<div id="app">
<div style="width:80%">
<table class="table table-bordered table-striped table-hover">
<thead>
<tr>
<th>ID</th>
<th>姓名</th>
<th>性别</th>
<th>地址</th>
</tr>
</thead>
<tbody>
<tr v-for="(stu,i) in students" :key="stu.id">
<td>{{stu.id}}</td>
<td>{{stu.name}}</td>
<td>{{stu.sex==1?'男':'女'}}</td>
<td>{{stu.addr}}</td>
</tr>
</tbody>
</table>
</div>
</div>
</template>
<style>
/*
全局样式 (没有加scoped),对整个项目的vue文件都生效
*/
.vl-notify.vl-notify-alert .vl-notify-content .vl-notify-content-div {
margin-top: 12px;
font-size: 14px;
margin-left: 10px;
-webkit-box-flex: 1;
-ms-flex: 1;
flex: 1;
}
</style>
<script>
import axios from 'axios';
import Qs from 'qs'; //cnpm install qs --save
export default {
name: 'App',
data(){
return {
students:[]
}
},
methods:{
},
mounted(){
//ajax写法一 (传统)
// $.ajax({
// url:'/api/student/findList',
// method:'get',
// dataType:'json',
// success:data =>{
// this.students=data.data;
// },
// error: ()=> {
// this.$layer.alert('请求失败', {icon: 1});
// }
// })
//ajax写法二(Promise)
// $.ajax({
// url:'/api/student/findList',
// method:'get',
// dataType:'json',
// }).then(data=>{
// this.students =data.data;
// }).catch(err=>{
// console.log(err);
// this.$layer.alert('请求失败!!!!', {icon: 1});
// });
// console.log(axios);
//测试一下 axios发出http请求
axios.get('/api/student/findList').then(response=>{
// console.log(response.data)
this.students=response.data.data;
}).catch(error=>{
this.$layer.alert('请求失败',{icon:1});
})
//注意axios.get默认传递的是键值对参数,而axios.post默认传递的是json参数
//如果post传的参数为json形式,则请求的Content-Type会自动设为application/json;charset=UTF-8,
//如果post传的参数为form表单(键值对)形式,则请求的Content-Type会自动设置为application/json;charset=UTF-8
//Qs.stringify()可以将json参数转为&拼接的普通键值对参数
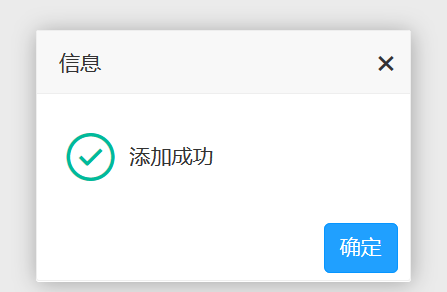
axios.post('/api/student/add',
Qs.stringify( {id:10,name:'王小虎',sex:1,addr:'南京市郊区的'})
).then(resp=>{
this.$layer.alert(resp.data.data,{icon:2});
}).catch(err=>{
this.$layer.alert('请求失败',{icon:1});
});
}
}
</script>
后端服务的代码非常简单,只需要提供两个接口:查询学生列表、添加学生, 模拟返回一些数据即可 。
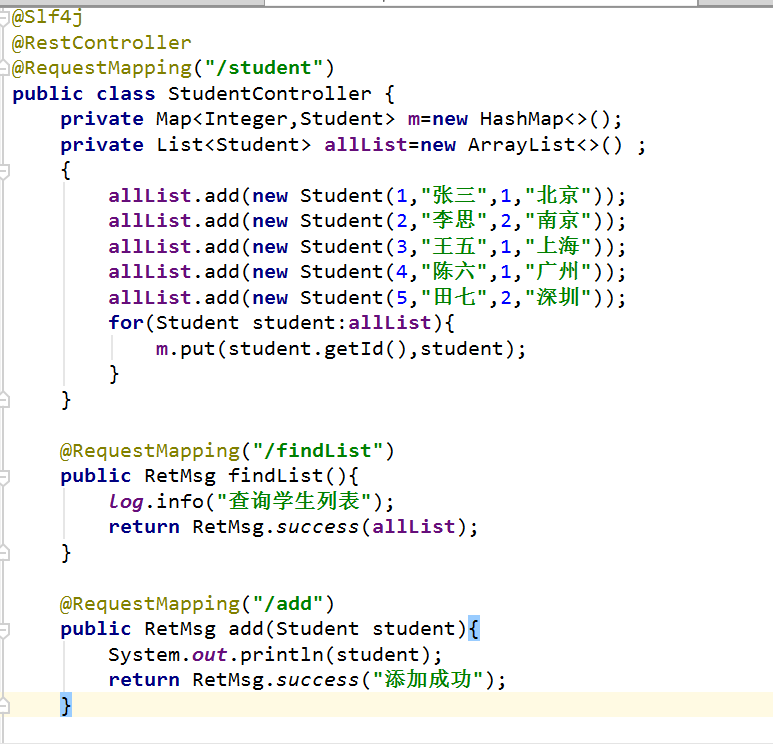
我们先需要启动一下后端服务(运行在8083端口),再启动vue工程, 打开浏览器访问 http://localhost:8080/
上一篇:vue中整合bootstrap
下一篇:容器管理平台rancher的搭建

数据加载中,请稍候...
数据加载中,请稍候...
 阅读排行
阅读排行
数据加载中,请稍候...
数据加载中,请稍候...
