springboot中整合rabbitmq(direct队列、topic队列) (原创)
作者: 朝如青丝暮成雪
发布时间:2020-08-08 18:56:02 文章分类:springboot 阅读(733) 评论(0)
发布时间:2020-08-08 18:56:02 文章分类:springboot 阅读(733) 评论(0)
如题: springboot中集成rabbitmq (direct队列、topic队列)
<!--引入mq 依赖-->
<dependency>
<groupId>org.springframework.boot</groupId>
<artifactId>spring-boot-starter-amqp</artifactId>
</dependency>
2、在application.yml中添加mq的相关配置
spring:
rabbitmq:
host: 192.168.11.10
port: 5672
username: rabbitmq
password: rabbitmq123
direct队列,最简单的一种模式(也最常用),一边收一边发,直接通过路由key来接收。
topic队列,使用发布/订阅模式, 一个发布者可以对应多个订阅者。
<!--引入mq 依赖-->
<dependency>
<groupId>org.springframework.boot</groupId>
<artifactId>spring-boot-starter-amqp</artifactId>
</dependency>
2、在application.yml中添加mq的相关配置
spring:
rabbitmq:
host: 192.168.11.10
port: 5672
username: rabbitmq
password: rabbitmq123
virtual-host: /
3、消息队列: direct队列的使用
(1) DirectQueueConfig.java
package com.tingcream.springmq.config;

import lombok.extern.slf4j.Slf4j;
import org.springframework.amqp.core.Binding;
import org.springframework.amqp.core.BindingBuilder;
import org.springframework.amqp.core.DirectExchange;
import org.springframework.amqp.core.Queue;
import org.springframework.context.annotation.Bean;
import org.springframework.context.annotation.Configuration;

/**
 * direct队列配置
 */
@Configuration
@Slf4j
public class DirectQueueConfig {

    public static  final String  QUEUE_NAME="directQueue";
    public static  final String  EXCHANGE_NAME="directExchange";

    @Bean(name = QUEUE_NAME)
    public Queue  queue(){

     /*    (String name, boolean durable(默认true), boolean exclusive(默认false),
              boolean autoDelete(默认false),Map<String, Object> arguments(默认null))
            */
        return new Queue(QUEUE_NAME);
    }

    @Bean(name = EXCHANGE_NAME)
    public DirectExchange  exchange(){
        //  DirectExchange(name, durable(默认true), autoDelete(默认false),Map<String, Object> arguments(默认null))
        return new DirectExchange(EXCHANGE_NAME);

    }
    @Bean(name = EXCHANGE_NAME+":"+QUEUE_NAME)
    public Binding  binding(){
        Queue queue= queue();
        DirectExchange exchange= exchange();
        return BindingBuilder.bind(queue).to(exchange).with(queue.getName());
    }

}
(2) direct 队列监听处理器
import com.rabbitmq.client.Channel;
import com.tingcream.springmq.config.DirectQueueConfig;
import org.springframework.amqp.rabbit.annotation.*;
import org.springframework.amqp.support.AmqpHeaders;
import org.springframework.messaging.handler.annotation.Header;
import org.springframework.messaging.handler.annotation.Payload;
import org.springframework.stereotype.Component;

import java.io.IOException;
import java.util.Random;

/**
 * direct mq监听器
 */
@Component
//@RabbitListener(queues = DirectQueueConfig.QUEUE_NAME)

@RabbitListener(
        bindings = @QueueBinding(
                value = @Queue(value = DirectQueueConfig.QUEUE_NAME,
                        durable = "true"),
                exchange = @Exchange(value =DirectQueueConfig.EXCHANGE_NAME),
                key = DirectQueueConfig.QUEUE_NAME
        )
)
public class DirectQueueListener {

    private Random random=new Random();

    @RabbitHandler
    public void onMessage(@Payload String message, Channel channel,
                          @Header(AmqpHeaders.DELIVERY_TAG) long deliveryTag) {

        try {
            System.out.println("接收到消息:"+message);
            System.out.println("处理消息成功:"+message);

        }catch (Exception e){
            e.printStackTrace();
        }finally {
            try {
                channel.basicAck(deliveryTag,true);
            } catch (IOException e) {
                e.printStackTrace();
            }
        }
    }

}
(3) 测试发送
@RunWith(SpringRunner.class)
@SpringBootTest
public class MyTest2 {
    @Autowired
    private AmqpTemplate amqpTemplate;


    /**
     * direct 消息发送
     */
    @Test
    public void testSend(){

       amqpTemplate.convertAndSend("directExchange","directQueue","1111");
       amqpTemplate.convertAndSend("directExchange","directQueue","2222");
       amqpTemplate.convertAndSend("directExchange","directQueue","3333");
       amqpTemplate.convertAndSend("directExchange","directQueue","4444");
       amqpTemplate.convertAndSend("directExchange","directQueue","5555");
       amqpTemplate.convertAndSend("directExchange","directQueue","6666");

    }

}
4、消息队列: topic队列的使用
(1) TopicQueueConfig.java
package com.tingcream.springmq.config;

import org.springframework.amqp.core.Binding;
import org.springframework.amqp.core.BindingBuilder;
import org.springframework.amqp.core.Queue;
import org.springframework.amqp.core.TopicExchange;
import org.springframework.context.annotation.Bean;
import org.springframework.context.annotation.Configuration;

/**
 * topic 队列配置
 */
@Configuration
public class TopicQueueConfig {
    public static final String TOPIC_QUEUE1="mytopic.aa";
    public static final String TOPIC_QUEUE2="mytopic.bb";
    public static final String TOPIC_QUEUE3="mytopic.all";

    public static final String TOPIC_EXCHANGE_NAME="topicExchange";


    @Bean
    public Queue queue1(){
        return new Queue(TOPIC_QUEUE1);
    }

    @Bean
    public Queue queue2(){
        return new Queue(TOPIC_QUEUE2);
    }

    @Bean
    public Queue queue3(){
        return new Queue(TOPIC_QUEUE3);
    }


    @Bean
    public TopicExchange topicExchange(){
        return new TopicExchange(TOPIC_EXCHANGE_NAME);
    }


    @Bean
    public Binding binding1(){
        Queue queue= queue1();
        TopicExchange exchange= topicExchange();
        return BindingBuilder.bind(queue).to(exchange).with("mytopic.aa");
    }
    @Bean
    public Binding binding2(){
        Queue queue= queue2();
        TopicExchange exchange= topicExchange();
        return BindingBuilder.bind(queue).to(exchange).with("mytopic.bb");
    }
    @Bean
    public Binding binding3(){
        Queue queue= queue3();
        TopicExchange exchange= topicExchange();
        return BindingBuilder.bind(queue).to(exchange).with("mytopic.#");
    }


}
(2) Topic队列监听
package com.tingcream.springmq.topicListener;

import com.rabbitmq.client.Channel;
import com.tingcream.springmq.config.TopicQueueConfig;
import org.springframework.amqp.rabbit.annotation.RabbitHandler;
import org.springframework.amqp.rabbit.annotation.RabbitListener;
import org.springframework.amqp.support.AmqpHeaders;
import org.springframework.messaging.handler.annotation.Header;
import org.springframework.messaging.handler.annotation.Payload;
import org.springframework.stereotype.Component;

import java.io.IOException;

/**
 * topic队列监听
 */
@Component
public class TopicQueueListener {


    /**
     *   路由key为 mytopic.aa
     * @param message
     */
    @RabbitListener(queues = TopicQueueConfig.TOPIC_QUEUE1)
    @RabbitHandler
    public void work1(@Payload String message, Channel channel,
                      @Header(AmqpHeaders.DELIVERY_TAG) long deliveryTag){
        try {
            System.out.println("TopicQueueListener的work1方法接收到消息:"+message);
        }catch (Exception e){
            e.printStackTrace();
        }finally {
            try {
                //回复ack
                channel.basicAck(deliveryTag, true);
            } catch (IOException e) {
                e.printStackTrace();
            }
        }
    }

    /**
     *   路由key为 mytopic.bb
     * @param message
     */
    @RabbitListener(queues = TopicQueueConfig.TOPIC_QUEUE2)
    @RabbitHandler
    public void work2(@Payload String message, Channel channel,
                      @Header(AmqpHeaders.DELIVERY_TAG) long deliveryTag){

        try {
            System.out.println("TopicQueueListener的work2方法接收到消息:"+message);
        }catch (Exception e){
            e.printStackTrace();
        }finally {
            try {
                //回复ack
                channel.basicAck(deliveryTag, true);
            } catch (IOException e) {
                e.printStackTrace();
            }
        }

    }
    /**
     *   路由key为 mytopic.#
     * @param message
     */
    @RabbitListener(queues = TopicQueueConfig.TOPIC_QUEUE3)
    @RabbitHandler
    public void work3( String message){
       System.out.println("TopicQueueListener的work3方法接收到消息:"+message);
    }

}
(3) 测试发送消息
@RunWith(SpringRunner.class)
@SpringBootTest
public class MyTest2 {
    @Autowired
    private AmqpTemplate amqpTemplate;


    /**
     * topic 发送消息
     */
    @Test
    public void testSend2(){
        amqpTemplate.convertAndSend("topicExchange","mytopic.aa","aaaa");
        amqpTemplate.convertAndSend("topicExchange","mytopic.bb","bbbb");
        amqpTemplate.convertAndSend("topicExchange","mytopic.cc","cccc");


    }
}

控制台打印结果表明了: work1方法只处理了 路由key为mytopic.aa 的消息, work2方法只处理了 路由key为mytopic.bb 的消息,而
work3方法处理了路由key为mytopic.# 的所有的消息, OK !
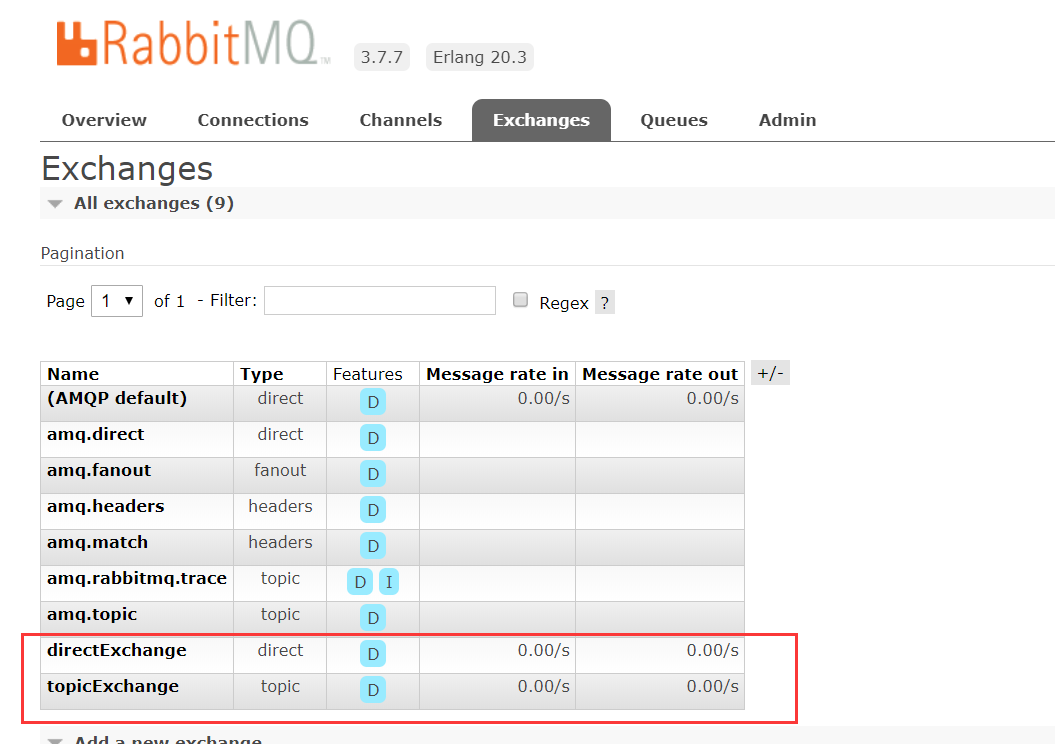
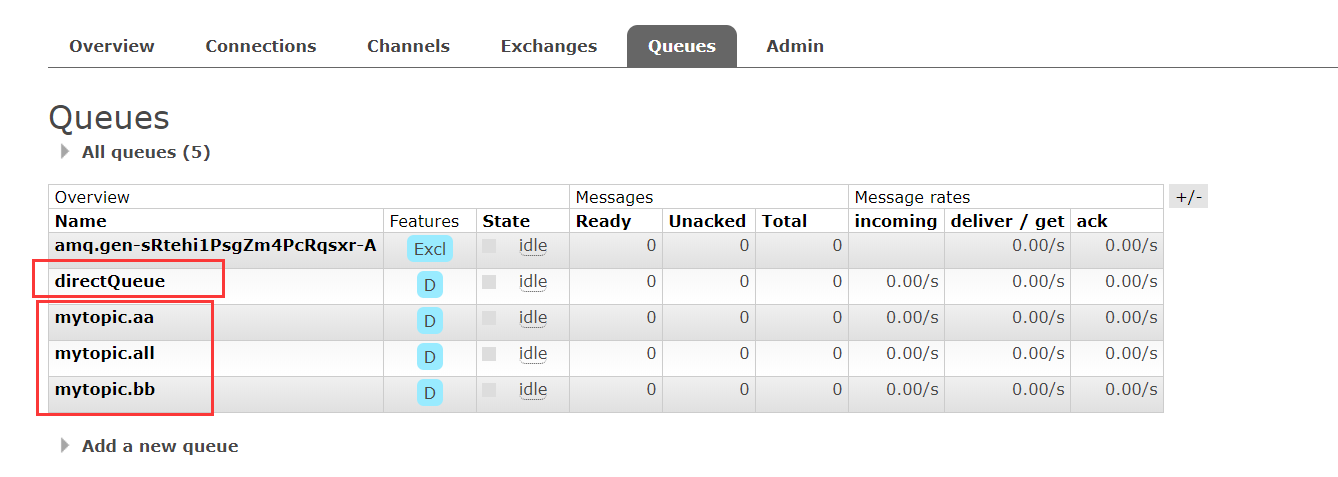
瞅一眼mq的管理后台
暂无评论

数据加载中,请稍候...
数据加载中,请稍候...
 阅读排行
阅读排行
数据加载中,请稍候...
数据加载中,请稍候...
